FLASH SALE Get 20% OFF everything using the coupon code: FLASH20 View Pricing Plans →

Categories

Documentation

Theme Documentation


Plugin Documentation


Resources

How to Increase the WordPress PHP Memory Limit

On many hosting providers the default PHP Memory is usually 32 or 64 MB, however for WordPress that may not be enough sometimes, especially if you have a lot of plugins installed on your website.

We recommend to increase the memory to at least 512 MB.

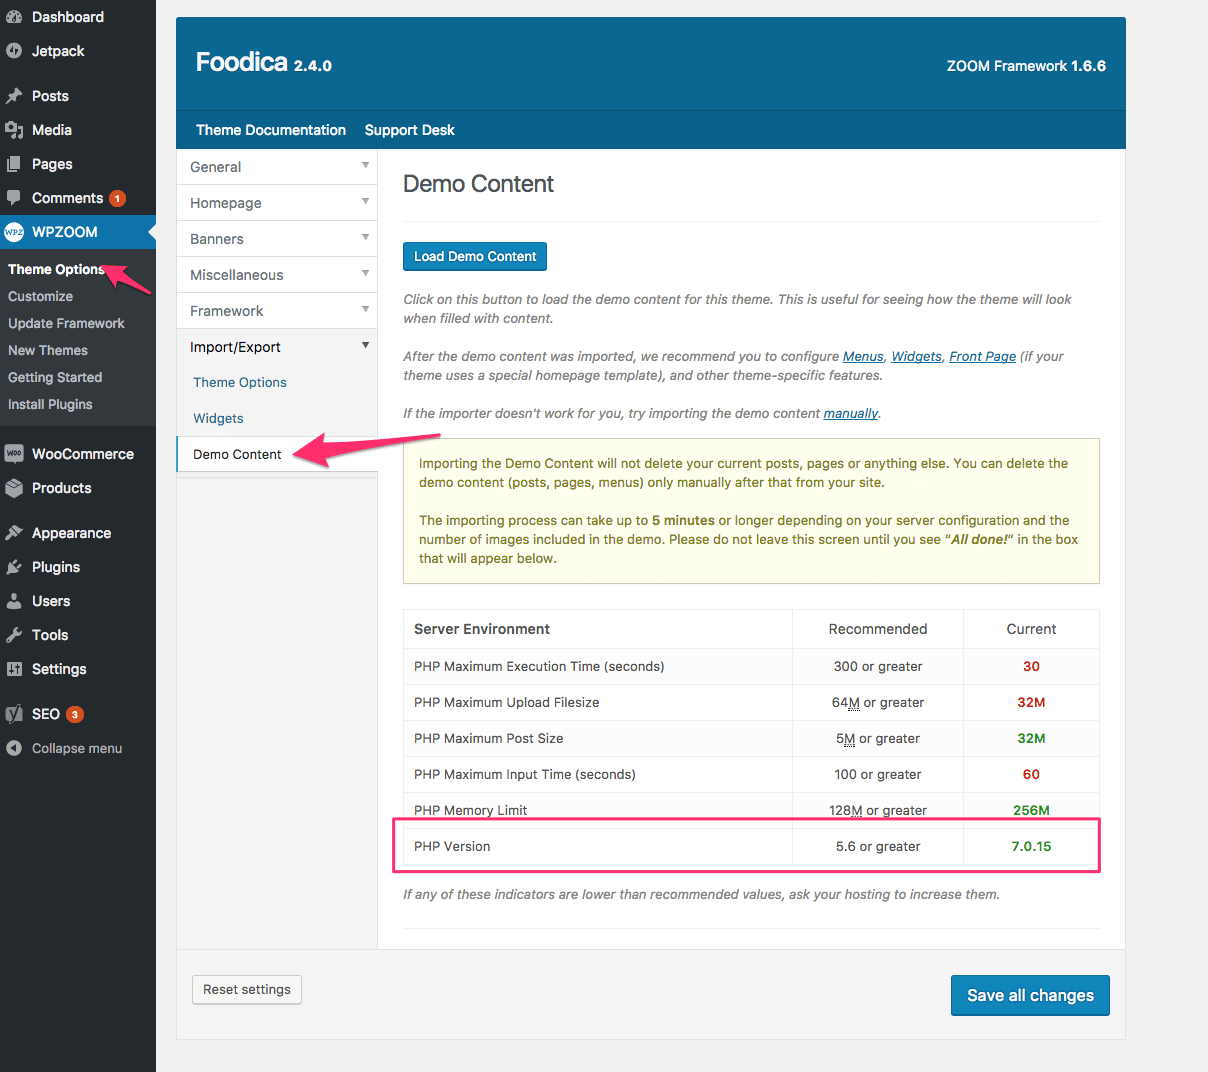
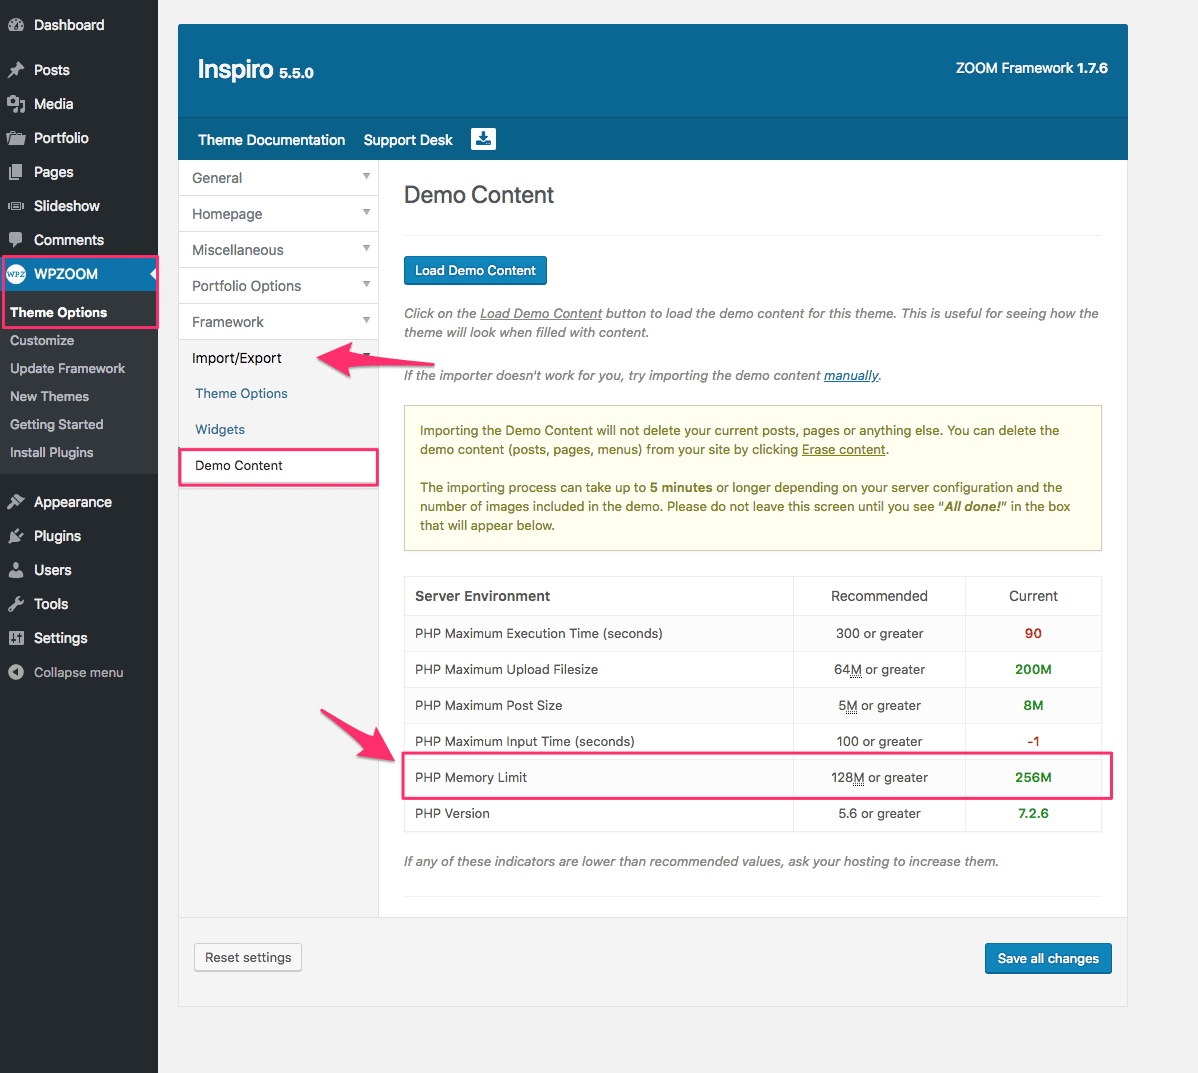
If you’re not sure what is the current memory on your website, you can find out that in the WPZOOM Theme Options page, under the Import/Export > Demo Content section:

Increasing the WordPress Memory Limit

To address memory limit issues, there are four ways:

  1. Method 1: Edit wp-config.php File
  2. Method 2: Modify the PHP.ini File
  3. Method 3: Update .htaccess File
  4. Contact Your Host

1. Edit wp-config.php File

Editing the wp-config.php file is the most direct way to increase your WordPress memory limit. This file controls your site’s core settings and is located in your WordPress root directory. Before making any changes, create a backup of your site to prevent potential issues.

Follow these steps to modify your memory limit:

1. Access Your WordPress Files. First, connect to your website using an FTP client like FileZilla, or use your hosting provider’s file manager. Navigate to your site’s root directory (usually public_html or www).

2. Locate wp-config.php. Find the wp-config.php file in your root directory. This file contains critical WordPress configuration settings. Download a backup copy to your computer before making any changes.

wp-config.php file

3. Add the Memory Limit Code. Open wp-config.php in a text editor and look for this line:

define('WP_MEMORY_LIMIT', '32M');

If you find it, change the value to your desired limit. If you don’t see this line, add it before the line that says “/* That’s all, stop editing! Happy publishing. */“:

WordPress memory limit in wp-config.php

4. Save and Upload. Save your changes and upload the modified file back to your server. Clear your browser cache and refresh your WordPress admin area.

Important Considerations:

  • Don’t set the limit higher than your hosting plan allows
  • Start with 128M or 256M before trying larger values
  • Some hosts may override these settings
  • If you can’t save changes, check file permissions

If you get a server error after making these changes, immediately restore your backup copy of wp-config.php. Not all hosting environments allow memory limit adjustments through this metho


Method 2: Modify the PHP.ini File

If editing wp-config.php doesn’t resolve your memory issues, you can try adjusting your server’s PHP.ini file. This method changes PHP settings at the server level, but it may not be available if you’re using shared hosting.

Follow these steps to modify your PHP.ini file:

1. Check Access and Location. Most hosts store the PHP.ini file in your site’s root directory. If you can’t find it, you may need to create one. Some shared hosting providers offer PHP settings in their control panel instead.

2. Locate or Create PHP.ini. If you need to create a new PHP.ini file, use a text editor to create a blank file named ‘php.ini‘. Add these lines:

memory_limit = 256M
upload_max_filesize = 64M
post_max_size = 64M
max_execution_time = 300
max_input_time = 300

If the file exists, find these lines and update their values:

memory_limit = 256M

Key Settings to Consider:

  • memory_limit should be the largest value
  • post_max_size should be larger than upload_max_filesize
  • max_execution_time affects how long scripts can run

4. Save and Test. Upload the file to your root directory. Your hosting server may need to restart for changes to take effect. Test your site to ensure everything works correctly.

Troubleshooting Tips:

  • If changes don’t work, your host may have restrictions
  • Check your hosting control panel for PHP settings
  • Some hosts require support tickets for PHP changes
  • Verify file permissions are set correctly

Remember to clear your browser cache and restart your WordPress admin session after making these changes.


Method 3: Update .htaccess File

The .htaccess file offers another way to increase your WordPress memory limit, particularly useful when you don’t have access to PHP.ini. This method works on Apache servers and serves as a last resort if other methods fail.

Step-by-Step Process:

1. Find Your .htaccess File. Connect to your site via FTP and locate the .htaccess file in your WordPress root directory. Since it’s a hidden file, you might need to enable ‘Show Hidden Files’ in your FTP client.

2. Create a Backup. Before making any changes, download a copy of your current .htaccess file. If something goes wrong, you can quickly restore this backup.

3. Add Memory Limit Rules. Add these lines at the end of your .htaccess file:

php_value memory_limit 256M
php_value upload_max_filesize 64M
php_value post_max_size 64M
php_value max_execution_time 300

Important Guidelines:

  • Place new rules after any existing WordPress rules
  • Keep the memory_limit higher than other values
  • Don’t exceed your hosting plan’s maximum limits
  • Maintain proper file permissions (usually 644)

4. Test Your Site. After saving changes, check your site immediately. If you see a 500 Internal Server Error:

  • Remove the added lines immediately
  • Restore your backup .htaccess file
  • Try smaller memory values
  • Contact your host for supported limits

Common Issues and Solutions:

  • If changes don’t work, your host might not allow .htaccess overrides
  • Some hosts require different syntax for these rules
  • Server configurations might block certain PHP values
  • Shared hosting often has stricter limitations

Remember to clear your cache and test your site thoroughly after making these changes. If problems persist, revert to your backup file and try a different method.


Contact Your Host

If you’ve tried the methods outlined in this guide and are still encountering WordPress memory limit errors, it may be time to contact your hosting provider. Your host can help you diagnose the issue and provide guidance on the best solution for your specific setup.

Situations where you should reach out to your host include:

  • You don’t have access to your site’s wp-config.php, php.ini, or .htaccess files
  • Editing these files doesn’t resolve the memory limit error
  • You’re unsure of the appropriate memory limit value for your site
  • Your site is on a shared hosting plan and you’re worried about exceeding your plan’s resources

When contacting your host, be sure to provide as much detail as possible about the issues you’re experiencing and the steps you’ve already taken to troubleshoot the problem. This will help your host provide more targeted assistance.

Some hosting providers offer managed WordPress hosting plans that include automatic memory limit increases and other performance optimizations. If you’re frequently running into memory limit issues or want a more hands-off approach to managing your site’s resources, consider upgrading to a managed WordPress hosting plan

Last updated on January 20, 2025

Related Docs