You can add social media icons to WordPress using the built-in Social Icons block, a plugin like WPZOOM Social Icons Widget & Block, or custom HTML code. The Social Icons block works for most sites and requires no plugin at all.
Social media icons (sometimes called social media buttons or social media links) are small, clickable graphics that link visitors to your social media profiles on platforms like Facebook, Instagram, X (formerly Twitter), LinkedIn, and YouTube. When placed in visible areas of your site (your header, footer, or sidebar), they give visitors an easy way to follow you and stay connected.
One quick clarification before we get started: social media icons and social share buttons are not the same thing. Social media icons link to your profiles so visitors can follow you. Share buttons let visitors share your content to their own feeds. This guide focuses on social media icons. We’ll cover the difference in more detail later in this article.
This guide covers three methods for adding social icons to WordPress, along with placement instructions for your header, footer, sidebar, and menu. Here’s how to choose the right approach.
Table of contents
- Which Method Should You Use?
- How to Add Social Media Icons with the WordPress Social Icons Block
- How to Add Social Media Icons with the WPZOOM Plugin
- How to Add Social Media Icons to Your WordPress Menu
- How to Add Custom Social Media Icons Without a Plugin
- How to Customize Your Social Media Icons
- Social Media Icons vs. Share Buttons: What’s the Difference?
- Frequently Asked Questions
- Start Adding Social Media Icons to Your Site
Which Method Should You Use?
Before walking through each method step by step, here’s a quick comparison to help you decide:
| Method | Best For | Skill Level | Cost |
|---|---|---|---|
| Social Icons Block (built-in) | Most sites with basic needs | Beginner | Free |
| WPZOOM Social Icons Plugin | Custom icons, advanced styling, 400+ platforms | Beginner | Free / PRO |
| Custom HTML/CSS | Developers who want full control | Advanced | Free |
If you’re using a block theme and only need icons for major platforms like Facebook, Instagram, and YouTube, the native Social Icons block is all you need. It’s lightweight, uses SVG icons, and won’t slow your site down.
If you need icons for niche platforms, want to upload custom SVGs, or need Elementor support, a plugin gives you more flexibility. The WPZOOM Social Icons & Sharing Buttons supports 400+ icons and works with the block editor, widgets, and Elementor.
Only go the custom code route if you have very specific design needs that neither the block nor a plugin can handle.
How to Add Social Media Icons with the WordPress Social Icons Block
WordPress includes a built-in Social Icons block that covers 40+ social platforms. It renders lightweight SVG icons, which means it won’t affect your page load speed. This is the fastest way to add social media icons to WordPress without a plugin, and it works in both pages and site-wide template parts.
Adding Social Icons to a Page or Post
- Open the page or post where you want to add social icons in the block editor.
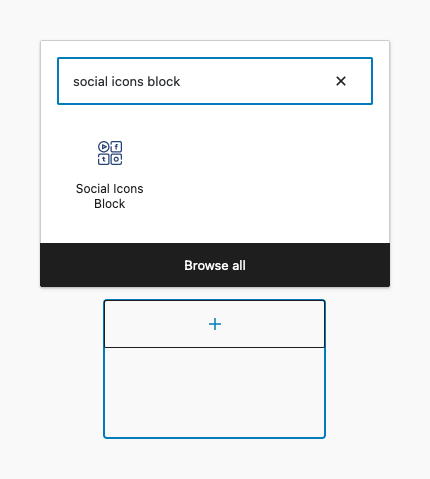
- Click the + (block inserter) button and search for Social Icons.
- Select the Social Icons block to add it to your content.
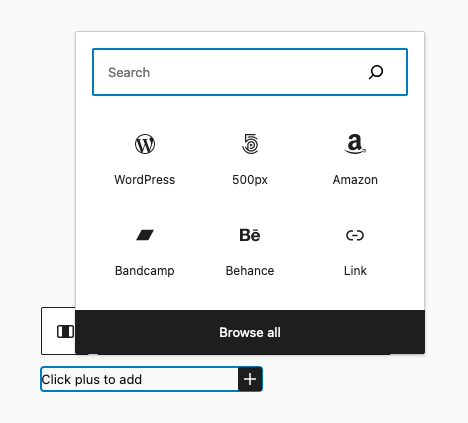
- Click the + icon inside the block to add individual social platforms. You can browse the list or type a platform name (like “Instagram” or “LinkedIn”) to search.
- Click on each icon and enter the URL to your social media profile.
- Repeat for each platform you want to include.

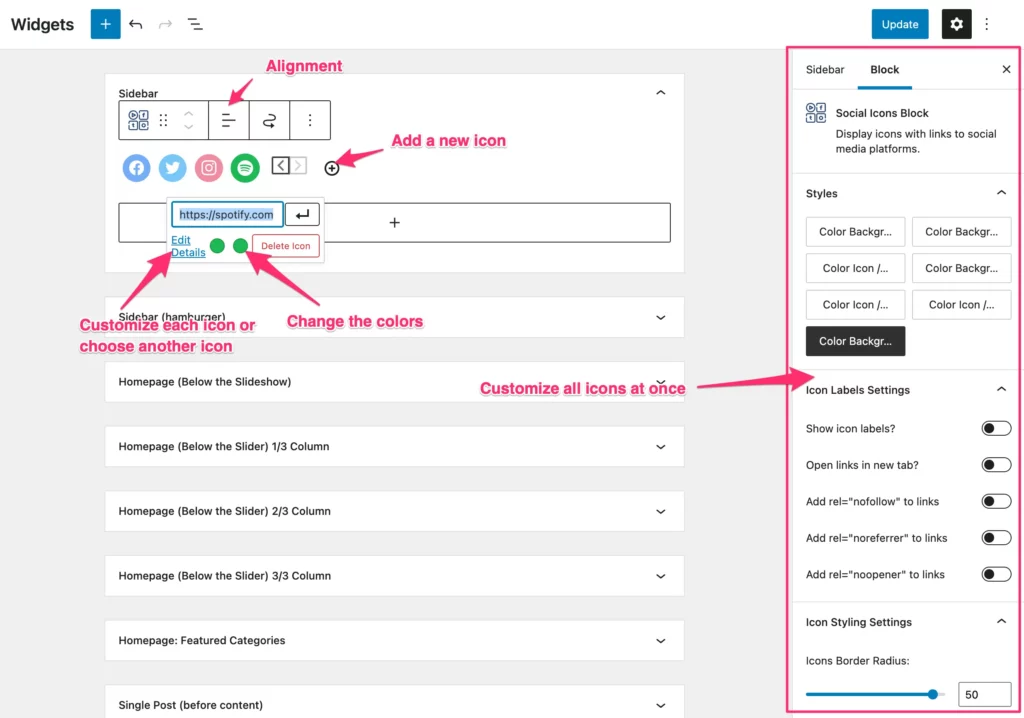
Once your icons are in place, you can customize their appearance using the block toolbar and the settings sidebar on the right:
Styles: Choose between three icon styles: Default (icons with a colored background), Logos Only (just the logo marks), and Pill Shape (rounded rectangular background). You’ll find these in the Styles panel of the block settings sidebar.
Size: Use the Size option in the block toolbar to pick from Small, Normal, Large, or Huge.
Colors: In the Styles panel, set a custom icon color and background color to match your brand.
Labels: Toggle “Show text” in the block settings to display platform names alongside the icons. This helps with accessibility.
Open in new tab: Enable this in the block settings so visitors don’t leave your site when they click through to your profiles.
Pro Tip: Always set social media icons to open in a new tab. This keeps visitors on your site while they check out your profiles.
Adding Social Media Icons to Your Header or Footer (Block Themes)
Placing social icons in your header or footer means they appear on every page of your site. If you’re using a block theme, you can do this through the Site Editor.
Template parts are reusable sections of your site (like headers and footers) that appear globally. When you edit a template part, the change is reflected across your entire site.
Here’s how to add social media icons to your header:
- Go to Appearance → Editor in your WordPress dashboard.
- Click Patterns, then find the Header template part under “All template parts.”
- Click the header to open it for editing.
- Click the + button to add a new block and search for Social Icons.
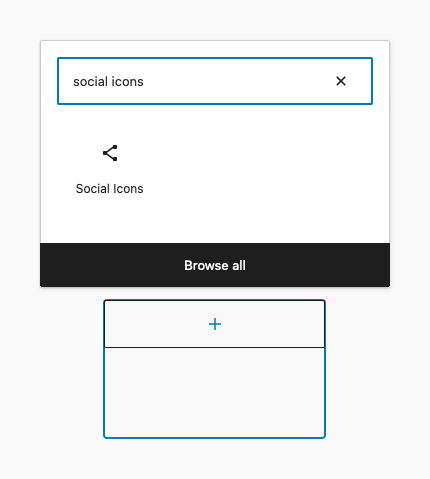
- Add your social platforms, enter your profile URLs, and style the icons.
- Click Save to apply the changes site-wide.
The process is the same for your footer. Just select the Footer template part instead.
For a deeper walkthrough of header customization, check out our guide on how to edit the header in WordPress. You can also learn how to edit the footer in WordPress if you need more details on footer layout options.
Adding Social Icons to Your Sidebar (Classic Themes)
If you’re using a classic WordPress theme, you won’t have access to the Site Editor. Instead, you can add social icons to your sidebar through the Widgets screen.
- Go to Appearance → Widgets in your dashboard.
- Find your Sidebar widget area (the name may vary depending on your theme).
- Click the + button at the top of the widget area and search for Social Icons.
- Add the Social Icons block, configure your platforms and URLs, and style the icons.
- Click Update to save your changes.
Your social icons will now appear in the sidebar across your site.
How to Add Social Media Icons with the WPZOOM Plugin
The native Social Icons block handles the basics well, but it has limitations. It supports around 40 platforms, offers limited styling options, and doesn’t let you upload custom social icons.
If you need more flexibility, the WPZOOM Social Icons & Sharing Buttons plugin is a WordPress plugin that offers a major upgrade. It includes 400+ icons from 5 different icon sets, custom SVG uploads, per-icon color pickers, and multiple background styles. It also works as a social media widget in classic themes, a Gutenberg block, and an Elementor widget.
Full disclosure: this plugin is developed by WPZOOM, the company behind this blog.
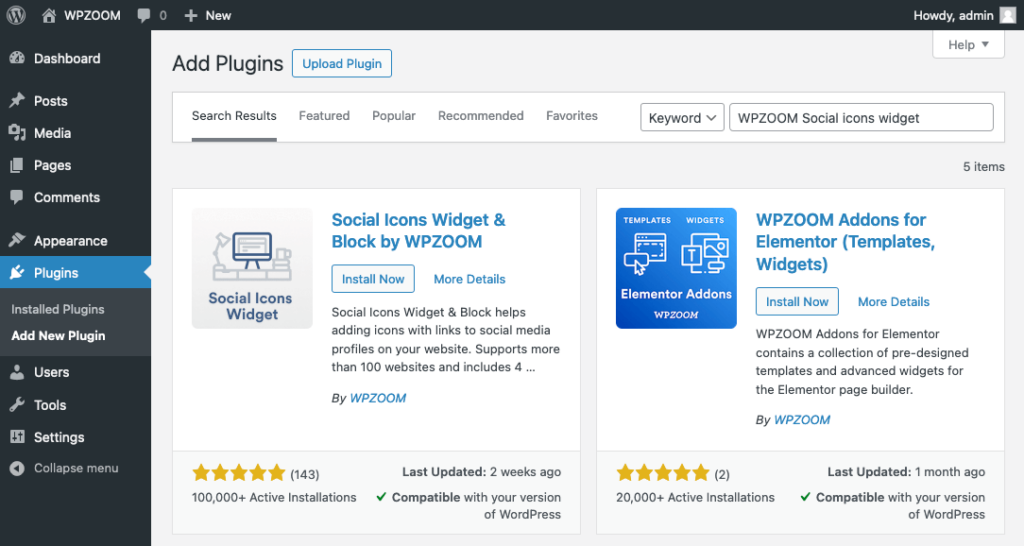
Installing the Plugin
- In your WordPress dashboard, go to Plugins → Add New.
- Search for “WPZOOM Social Icons” in the search bar.
- Click Install Now, then Activate.

Using the WPZOOM Social Icons Block
Once the plugin is active, you’ll have access to a new Social Icons Block by WPZOOM in the block editor (separate from the native WordPress block).
- Open any page, post, or template in the block editor.
- Click + and search for “Social Icons by WPZOOM” to add the block.
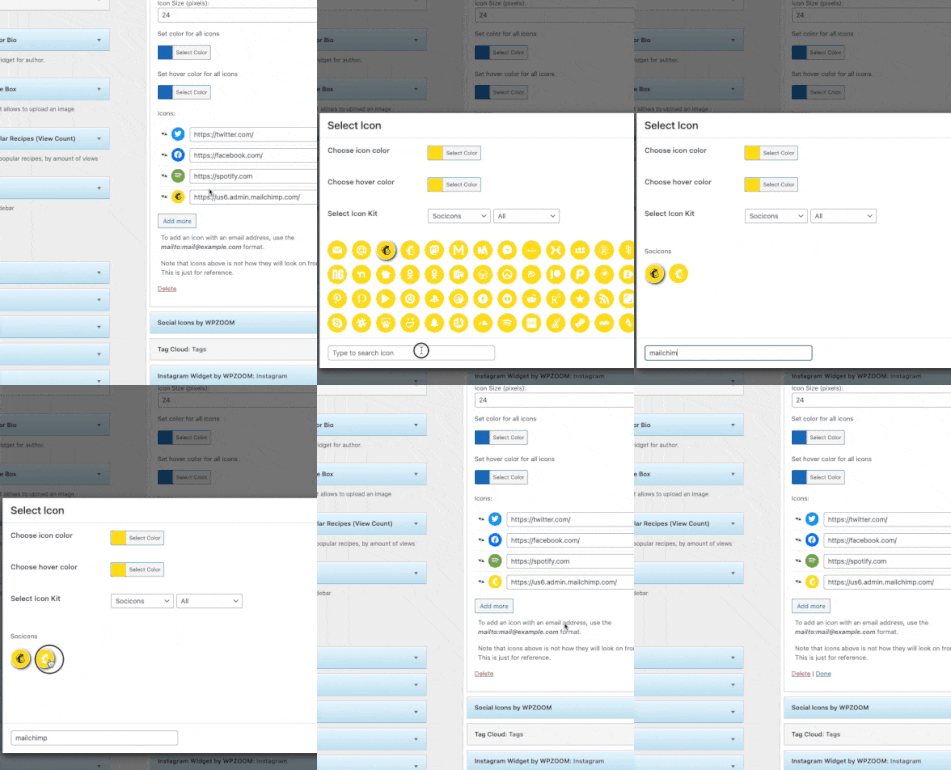
- Click on any icon placeholder to browse the icon library. You can search by keyword across all 5 icon sets.
- Enter the URL for each social profile. The plugin auto-detects the social network and applies the correct icon when you paste a URL.
- Customize colors, sizes, padding, and icon shape using the block settings sidebar.
Here’s what the WPZOOM block offers beyond the native block:
- 400+ icons from icon sets including Socicon, Font Awesome, Academicons, and Genericons
- Custom SVG uploads: Click any icon and select “Insert Custom SVG Icon” to use your own graphics
- Per-icon color picker: Set unique colors for each icon instead of a single global color
- Multiple background styles: Choose from Rounded Corners, Round, or Square shapes
- Drag & drop reordering: Rearrange icons by dragging them into position

Using the WPZOOM Widget (Classic Themes)
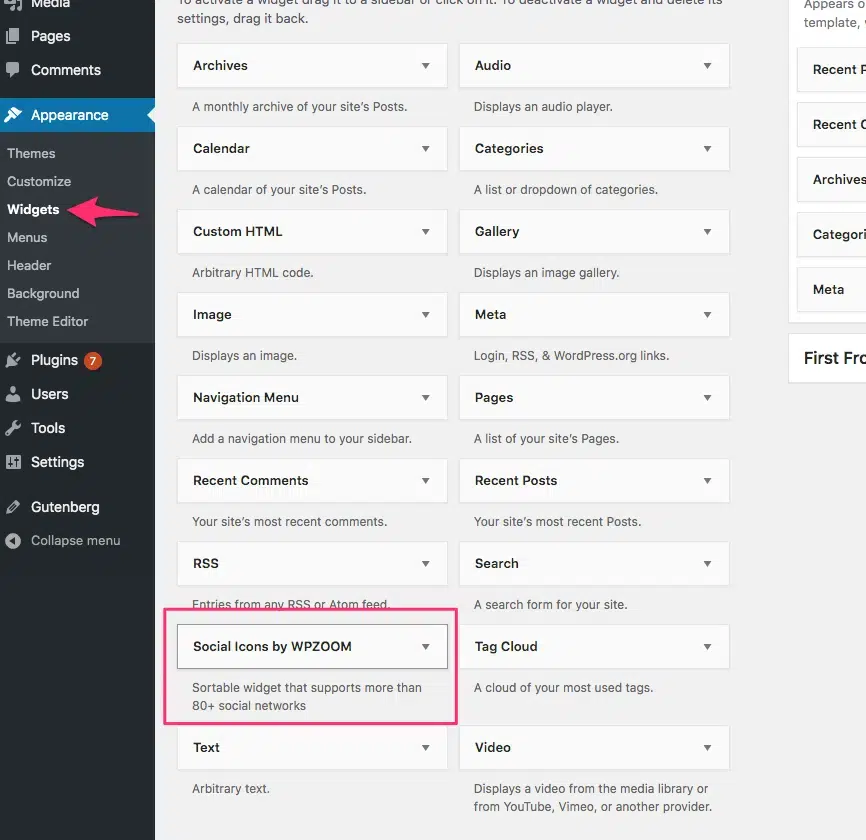
For classic themes, the plugin adds a Social Icons by WPZOOM widget to your widget areas.
- Go to Appearance → Widgets.
- Find the widget area where you want your icons (sidebar, footer, etc.).
- Add the Social Icons by WPZOOM widget.
- Add your profile URLs and customize icon appearance.
- Click Update to save.
Performance tip: Head to Settings → Social Icons Widget in your dashboard and disable any icon sets you’re not using. This prevents the plugin from loading unnecessary font files, keeping your pages fast.
WPZOOM PRO Features
The free version covers most needs, but WPZOOM Social Icons & Sharing Buttons PRO unlocks additional features: sharing buttons with support for AI platforms (ChatGPT, Claude, Perplexity), share counts and an analytics dashboard, floating social buttons, and nav menu integration. If you need both social icons and sharing buttons in one plugin, the PRO version handles both.
How to Add Social Media Icons to Your WordPress Menu
Adding social icons directly to your WordPress navigation menu keeps your header clean while still giving visitors easy access to your profiles.
Block Themes
If you’re using a block theme, the simplest approach is to add the Social Icons block directly within your header template part using the Site Editor. Follow the same steps described in the “Adding Social Media Icons to Your Header” section above. You can place the icons next to or below your navigation menu inside the header template.
Classic Themes
For classic themes, the process depends on whether your theme includes a dedicated Social Menu location:
If your theme supports a Social Menu:
- Go to Appearance → Menus.
- Create a new menu (or edit an existing one).
- Under Custom Links, paste the URL to your social profile (e.g., https://facebook.com/yourpage).
- Enter the platform name as the Link Text (e.g., “Facebook”).
- Click Add to Menu and repeat for each platform.
- Under Menu Settings → Display Location, check the Social Menu (or similar) box.
- Click Save Menu.
Most themes with a Social Menu location will automatically convert these links into platform icons.
If your theme doesn’t support a Social Menu, you can use the Font Awesome plugin combined with a menu icon plugin like Menu Image to add icon-based menu items. This takes a bit more setup but works with any classic theme.
How to Add Custom Social Media Icons Without a Plugin
If you’re comfortable with HTML and CSS, you can add social media icons manually using a Custom HTML block or by editing your theme’s template files directly.
This approach gives you complete control over design and placement. It’s a good fit if you need icons for a platform that no block or plugin supports, or if you have strict brand guidelines for how icons should look.
Here’s a basic example using a Custom HTML block:
<div style="display: flex; gap: 12px; align-items: center;">
<a href="https://facebook.com/yourpage" target="_blank" rel="noopener noreferrer">
<img src="https://b8f4g5a7.delivery.rocketcdn.me/wp-content/uploads/facebook-icon.svg" alt="Facebook" width="32" height="32">
</a>
<a href="https://instagram.com/yourprofile" target="_blank" rel="noopener noreferrer">
<img src="https://b8f4g5a7.delivery.rocketcdn.me/wp-content/uploads/instagram-icon.svg" alt="Instagram" width="32" height="32">
</a>
<a href="https://x.com/yourhandle" target="_blank" rel="noopener noreferrer">
<img src="https://b8f4g5a7.delivery.rocketcdn.me/wp-content/uploads/x-icon.svg" alt="X" width="32" height="32">
</a>
</div>
To use this method:
- Prepare your icon files (SVG or PNG) and upload them to your WordPress Media Library.
- Copy each icon’s file URL from the Media Library.
- Add a Custom HTML block wherever you want the icons to appear.
- Paste HTML similar to the example above, replacing the URLs with your own icon files and profile links.
Keep in mind that if you add custom code directly to theme template files (like header.php), those changes will be lost when the theme updates. Use a child theme to keep your modifications safe. For icons placed within content or widget areas, the Custom HTML block approach is safer and easier to maintain.
You can also use icon font libraries like Font Awesome instead of image files. Font Awesome provides vector icons for all major social platforms and loads them as web fonts or inline SVGs.
How to Customize Your Social Media Icons
Regardless of which method you use, you’ll want your social icons to match your site’s design. Here are the key customization options available in both the native block and the WPZOOM plugin.
Size: The native block offers preset sizes (Small, Normal, Large, Huge). The WPZOOM plugin gives you pixel-level control over icon size and padding.
Colors: Both options let you change icon color and background color. The WPZOOM plugin adds per-icon color control, so you can match each icon to its official brand color or use a uniform color scheme.
Shape: Choose from different icon shapes. The native block offers Default, Logos Only, and Pill Shape. The WPZOOM plugin adds Round, Square, and Rounded Corners options with adjustable background styles.
Spacing and alignment: Control how icons are spaced and whether they’re aligned left, center, or right. You can also set orientation to horizontal or vertical.
Open in new tab: Both the native block and WPZOOM plugin include this toggle. Enable it for all social icons so visitors stay on your site.
Text labels: The native block lets you show platform names next to icons. This improves accessibility for screen readers and helps visitors who may not recognize every logo.

Social Media Icons vs. Share Buttons: What’s the Difference?
This is one of the most common points of confusion for WordPress users, and it’s worth spelling out clearly.
Social media icons (also called follow buttons) link to your profiles. They’re static buttons that sit in your header, footer, sidebar, or menu. When a visitor clicks your Instagram icon, they go to your Instagram page. The goal: get followers.
Social share buttons let visitors share your content (a blog post, product page, etc.) to their own social feeds. They typically appear on or near individual posts and pages. The goal: get shares and traffic.
Here’s a side-by-side comparison:
| Social Media Icons | Social Share Buttons | |
|---|---|---|
| Purpose | Link to your profiles | Share your content |
| Typical placement | Header, footer, sidebar, menu | On or near blog posts and pages |
| Visitor action | Follows you on a platform | Shares your page to their feed |
| WordPress native support | Social Icons block | No native block (requires a plugin) |
| Example | Facebook icon → your Facebook page | “Share on Facebook” → shares the current post |
Both are valuable, and they complement each other. The WPZOOM Social Icons & Sharing Buttons plugin includes both social profile icons and sharing buttons in one package, so you don’t need two separate plugins.
Frequently Asked Questions
Use the built-in Social Icons block. Open the block editor, click the + button, search for “Social Icons,” add your platforms, and enter your profile URLs. This works in posts, pages, and template parts (in block themes) with no plugin needed.
With a block theme, go to Appearance → Editor, open the Header template part, and add the Social Icons block. With a classic theme, use a plugin like WPZOOM Social Icons & Sharing Buttons that supports widget areas, or add social links to a menu assigned to a header location.
The same process as the header. Edit the Footer template part in the Site Editor (block themes) or add a Social Icons widget to your footer widget area (classic themes).
WPZOOM Social Icons & Sharing Buttons is one of the most popular choices with 100,000+ active installs. It offers 400+ icons from 5 icon sets, custom SVG uploads, sharing buttons, and works with the block editor, widgets, and Elementor.
Click the icon you want to remove, open the three-dot menu (⋮), and select “Delete.” To remove an entire Social Icons block, select the block and press Delete or Backspace. If social icons were added by your theme, check Appearance → Editor (block themes) or your theme’s Customizer settings (classic themes).
Social media icons link visitors to your profiles so they can follow you. Social share buttons let visitors share your content on their own feeds. They serve different purposes and are usually placed in different areas of your site.
Yes. With a block theme, add the Social Icons block directly in your header template part through the Site Editor. With a classic theme, create a Social Menu with custom links pointing to your profiles. If your theme supports a Social Menu location, it will display those links as icons automatically.
The native Social Icons block supports TikTok, Threads, Bluesky, and other newer platforms. If your WordPress version doesn’t include them, the WPZOOM Social Icons plugin supports 100+ platforms including all the newer ones.
The native Social Icons block uses inline SVGs, so the performance impact is minimal. Plugins that load icon font libraries can add extra HTTP requests. The WPZOOM plugin lets you disable unused icon sets in its settings to keep page load times fast.
In the Social Icons block settings sidebar on the right, toggle on “Open links in new tab.” This applies to all icons in the block and keeps visitors on your site while they view your profiles.
Start Adding Social Media Icons to Your Site
Adding social media icons to WordPress is straightforward with any of the three methods we covered. The built-in Social Icons block handles the basics for most sites. If you need more icons, custom styling, or sharing buttons, the WPZOOM Social Icons & Sharing Buttons gives you those options without complexity.
The best placement depends on your site, but most sites benefit from social icons in the header or footer where they’re visible on every page. Start there, and add them to your sidebar or individual pages if it makes sense for your layout.
Looking for more ways to connect your site with social media? Check out our guide on how to embed an Instagram feed on WordPress to display your latest posts directly on your site.