Installing WordPress can be as straightforward or as hands-on as you like, depending on your chosen route.
There are two main ways to install WordPress: automatically, using hosting tools, or manually, which requires a bit more technical savvy.
Whether you prefer the convenience of one-click installs or the granular control of manual installations, we’ll walk you through both processes to show you how to install WordPress.
Table of Contents
- How to Install WordPress Automatically (Using Hosting Tools)
- How to Install WordPress Manually (Using FTP and MySQL)
- The Final Touch: Choose Your Ideal Theme
How to Install WordPress Automatically (Using Hosting Tools)
Many web hosting providers offer tools that can automatically install WordPress for you. This is the easiest and fastest way to get WordPress up and running.
Here’s how you can do it:
Use One-Click WordPress Install Tools
Many hosting services, such as SiteGround, Bluehost, or WP Engine, facilitate a one-click WordPress installation process through their control panel. This method allows you to install WordPress on your host account with just a few clicks, eliminating the need for manual software uploads or database setup.
Here’s a general overview of how it works:
- Access Your Hosting Dashboard: Log into your hosting account and navigate to the control panel or dashboard.
- Find the WordPress Installer: Look for an icon or link labeled “WordPress” or “One-Click Installs” in your dashboard.
- Initiate the Installation: Click on the WordPress installer icon and follow the on-screen instructions. You’ll typically choose the domain where you will install WordPress and might have the option to select the directory if you wish to install WordPress in a subfolder.
- Complete the Setup: Enter any requested information, such as site name, admin username, and password. After completing these steps, the installer will automatically install WordPress on your server.
Choosing a web host with a one-click WordPress install saves the time and effort required for manual installation. This is particularly beneficial for beginners or those looking to get their site up and running quickly.
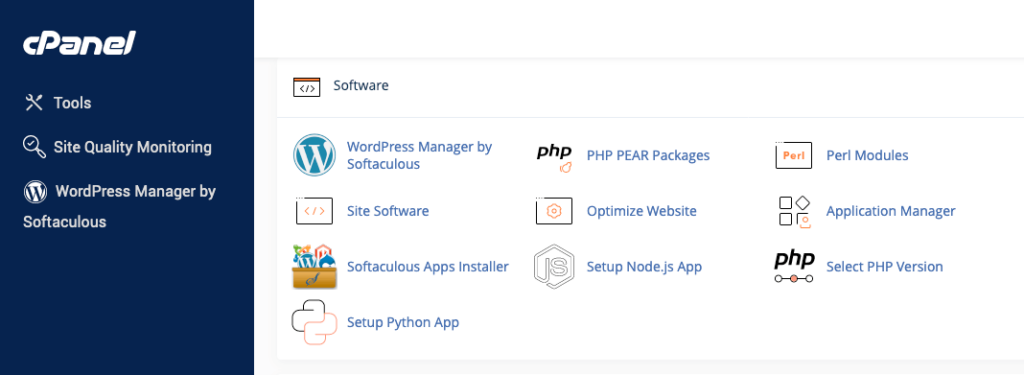
Install WordPress Using cPanel
If your hosting provider uses cPanel but doesn’t offer a one-click WordPress install, you can still install WordPress relatively easily:
- Access the cPanel: Log in to your web hosting account and navigate to the cPanel dashboard. You can do this through your hosting provider’s website or by clicking a direct link in your welcome email.
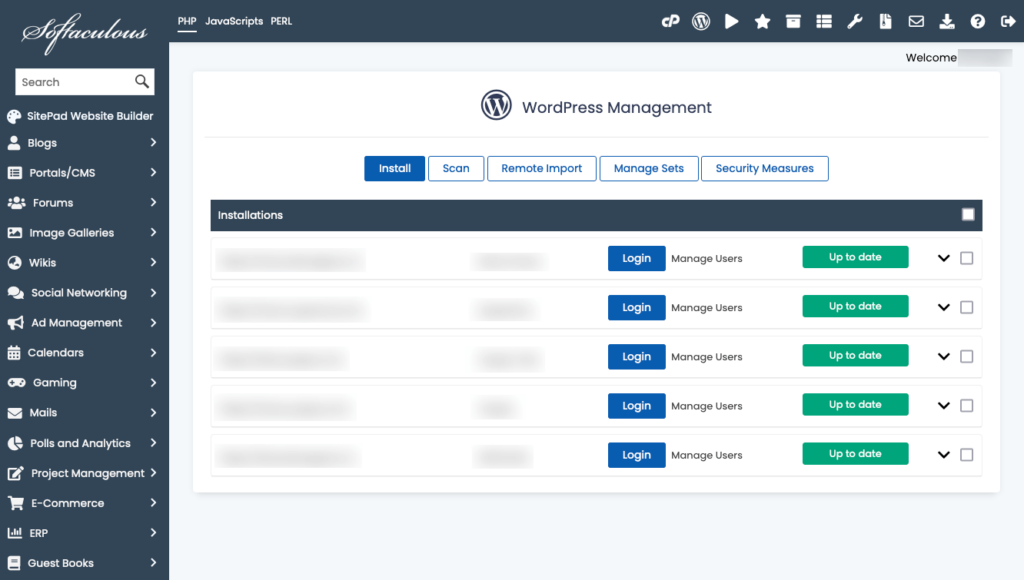
- Find the WordPress Installer: Look for the WordPress installer tool. Depending on your hosting provider, it might be named Softaculous, QuickInstall, or something similar.

- Launch the installer. Click the Install button to start the WordPress installation.

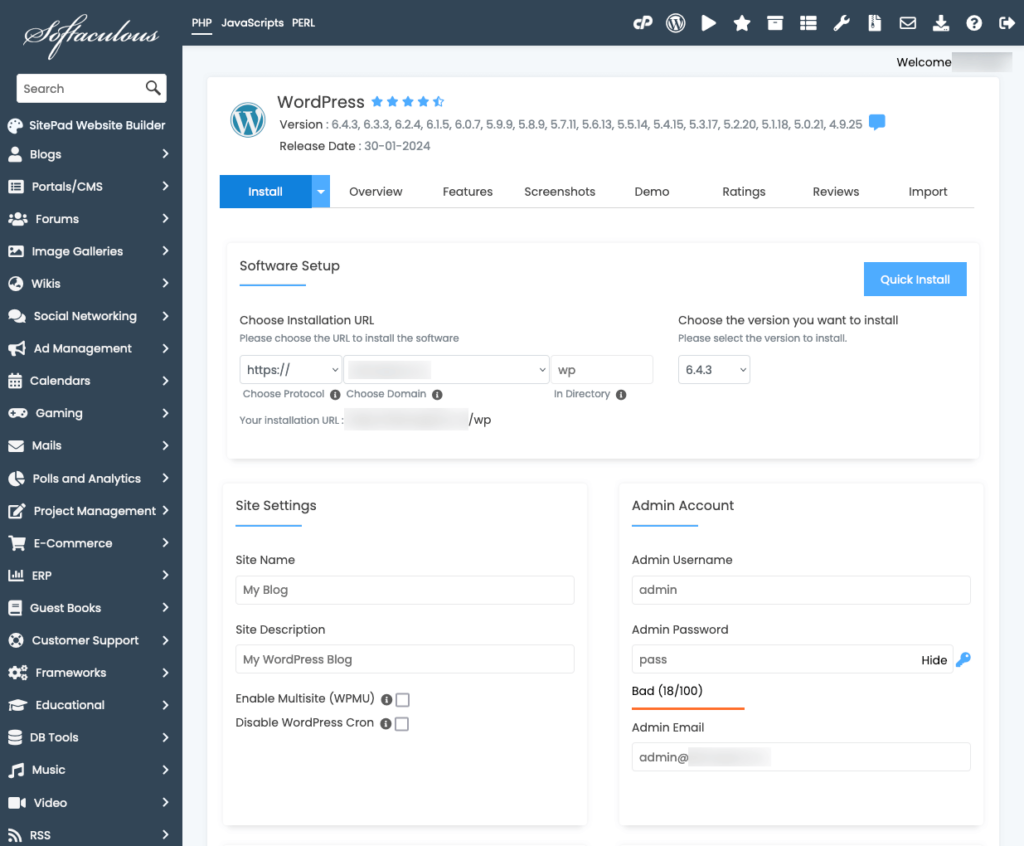
- Choose Installation Options: Before the installation begins, you’ll need to make a few decisions:
– Select the domain or subdomain where you want to install WordPress.
– Decide if you want to install WordPress in the root directory (making it the main site on that domain) or in a subdirectory (for creating a separate blog section or a test site).
– Enter your website name, description, admin username, password, and email address. Choosing a strong username and password to secure your site is crucial.
- Advanced Options: Depending on the installer, you might have access to advanced options like database name, table prefix, and backup settings. For most installations, you can leave these at their default values.

- Initiate the Installation: Click the Install button after configuring your settings. The installer will automatically create the database and files needed for WordPress. This process may take a few minutes.
- Confirmation and Final Steps: Once the installation is complete, you’ll receive a confirmation message with links to your WordPress site and the admin dashboard. It’s a good practice to log in and start configuring your site settings immediately.
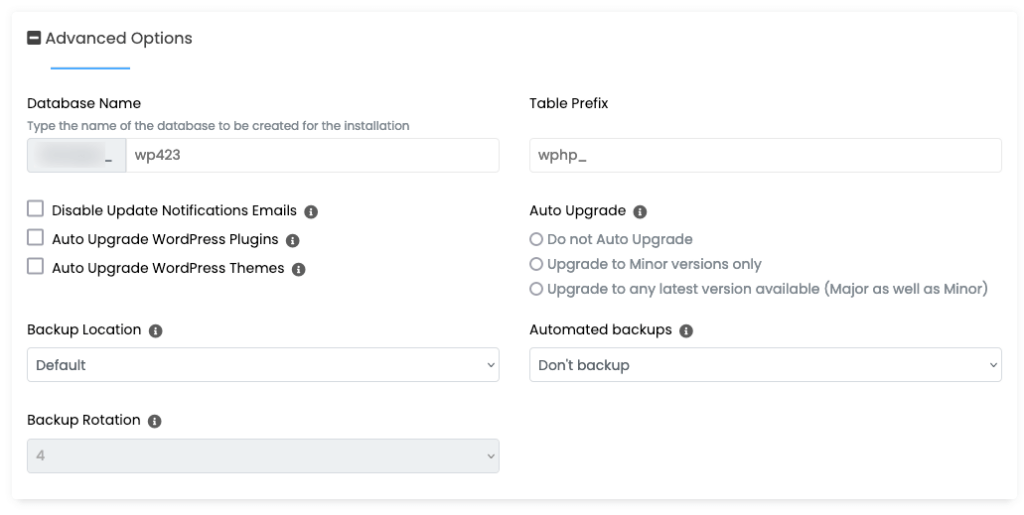
This method offers more control over the installation process than one-click installs, allowing for customization of settings like the database name and backup schedules. By setting up your admin credentials and database details, you enhance the security of your WordPress site from the start.
How to Install WordPress Manually (Using FTP and MySQL)
Installing WordPress manually is more technical but offers more control over the installation process. This approach provides flexibility and a deeper understanding of how WordPress works on your server. Here’s a detailed walkthrough:
Upload WordPress Files to Your Server
- Download WordPress: Navigate to the WordPress.org website, download the latest version of WordPress as a zip file.

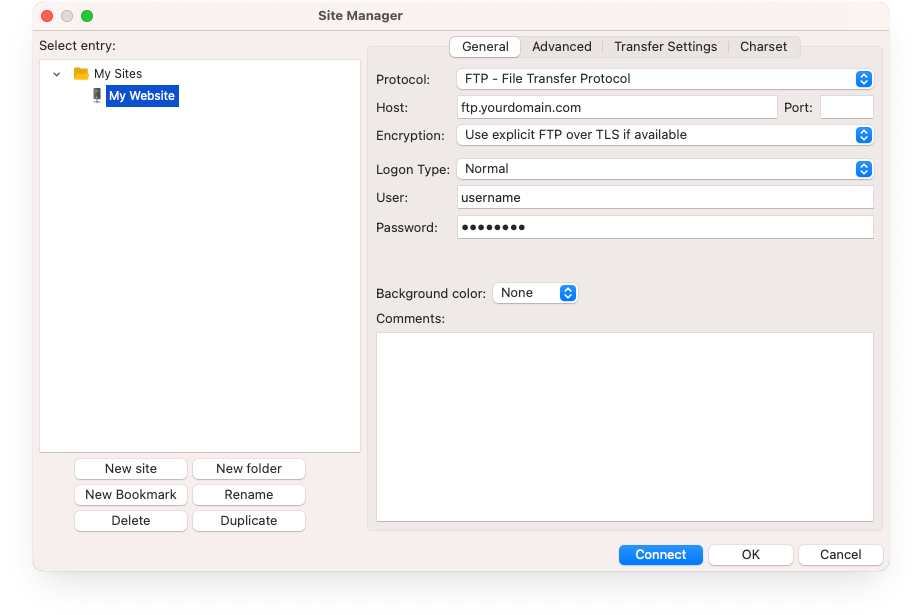
- Choose an FTP Client: You’ll need an FTP client (like FileZilla) to upload the WordPress files to your hosting account. An FTP (File Transfer Protocol) client is software that allows you to transfer files between your computer and your server.
- Connect to Your Server: Open your FTP client and enter the FTP login credentials provided by your hosting provider. These usually include a server address (like ftp.yourdomain.com), a username, and a password.
 Once connected, you’ll see the files and directories on your web server.
 - Uploading WordPress Files: Navigate to the directory where you want to install WordPress. For a primary site, this will typically be the public_html directory. You might upload the files to a different directory if you’re creating a subdomain or a separate part of your site. Inside your FTP client, locate the extracted “wordpress” folder on your computer, and upload all its contents to the chosen directory on your web server.
 Uploading all the WordPress files can take some time, depending on your internet connection speed and the hosting’s service performance.
 Once connected, you’ll see the files and directories on your web server.
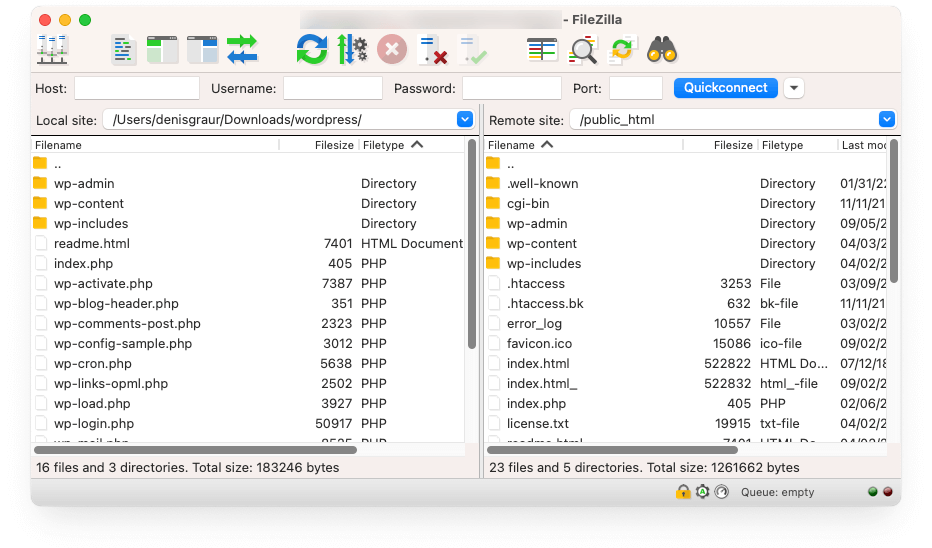 Uploading all the WordPress files can take some time, depending on your internet connection speed and the hosting’s service performance.
Once the WordPress files are uploaded to your hosting account, you’re ready to move on to creating a MySQL database and user, which are essential components for running WordPress.
Create a MySQL Database and User
For WordPress to function correctly, access to a MySQL database is required. Your site’s content and settings are stored in this database. Creating a MySQL database and assigning a user with the right privileges might sound technical, but most web hosting providers offer tools that simplify this process.
Here’s how you can do it:
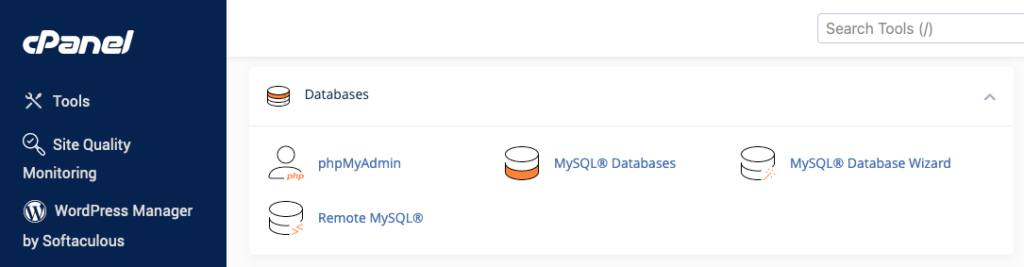
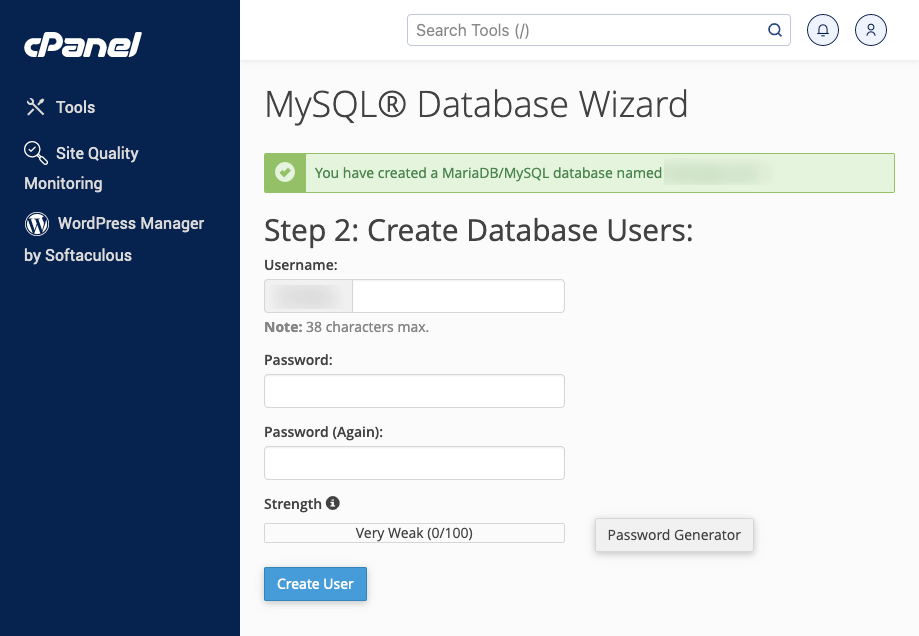
- Access the MySQL Database Wizard: Log into your hosting account’s cPanel and locate the MySQL Database Wizard under the Databases section. This wizard is a step-by-step guide to creating a new database and user.

- Name Your Database: The first step in the wizard is to name your new database. Try to use something related to your website or WordPress installation to make it easily identifiable. Note that your hosting provider may prepend a prefix to your database name based on your hosting account username.
Name Your Database: The first step in the wizard is to name your new database. Try to use something related to your website or WordPress installation to make it easily identifiable. Note that your hosting provider may prepend a prefix to your database name based on your hosting account username.
- Assign a User: Next, the wizard will prompt you to create or assign a user to your database. WordPress will use this username and password to access your database. For enhanced security, choose a strong password or use the password generator provided by cPanel.
 It’s crucial to keep a record of your database name, username, and password. You’ll need these details during the WordPress installation process to connect WordPress to your database.
 - Assign Privileges: These privileges define what actions the user can perform on the database. For WordPress to work correctly, the user needs full privileges. To grant or select all privileges individually, tick the All Privileges box and click the Make Changes button.

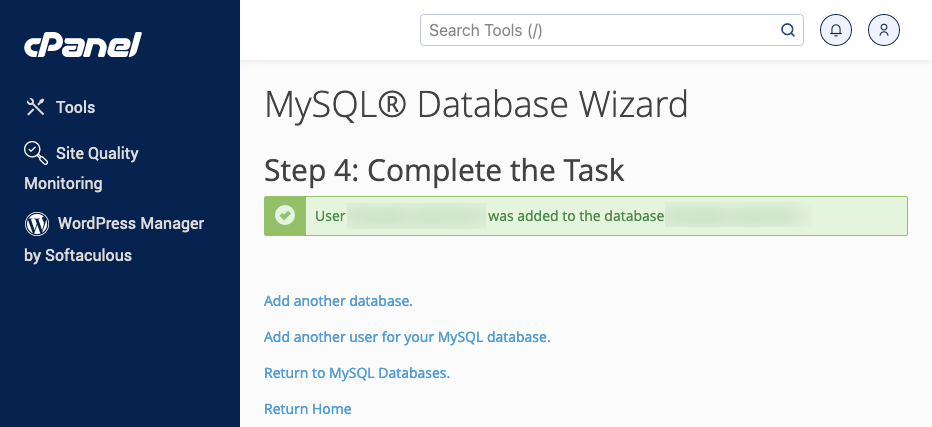
- Create Database: Your new database will now be set up and the user will be added to the database, but the database is empty until WordPress is connected and configured.


 It’s crucial to keep a record of your database name, username, and password. You’ll need these details during the WordPress installation process to connect WordPress to your database.
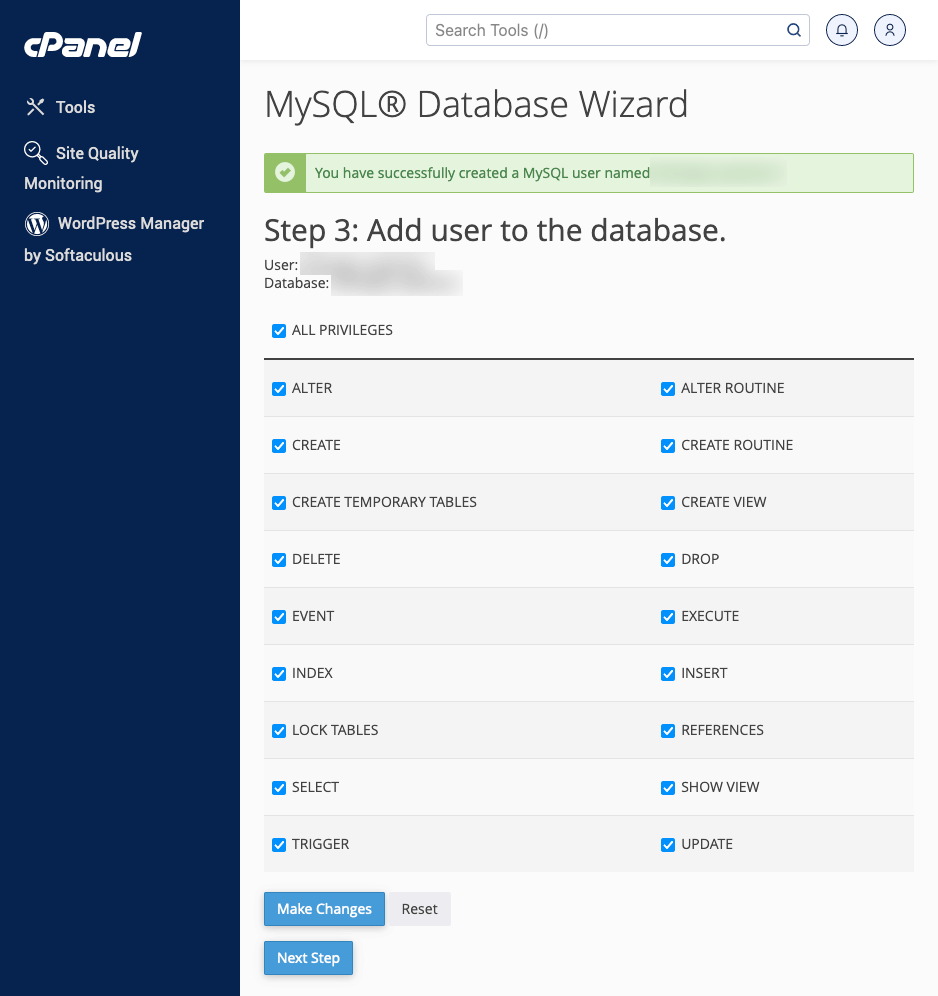
By completing these steps, you’ve created a foundation for storing your WordPress site’s data. The next phase involves connecting WordPress to your newly created MySQL database, which will be covered when you run the WordPress installation script and enter these database details.
Complete the Manual WordPress Installation
With your WordPress files uploaded to your hosting account and your MySQL database ready, the final step is to connect these components and finalize your WordPress installation. This process involves running the WordPress installation script, which is straightforward and sets up your site’s basic configuration.
- Run the WordPress Installation Script: Open your web browser and go to your website’s URL. If you uploaded WordPress to the root directory, enter your domain name. If you installed WordPress in a subdirectory, append the subdirectory’s name to your domain URL (e.g., yourdomain.com/blog/).
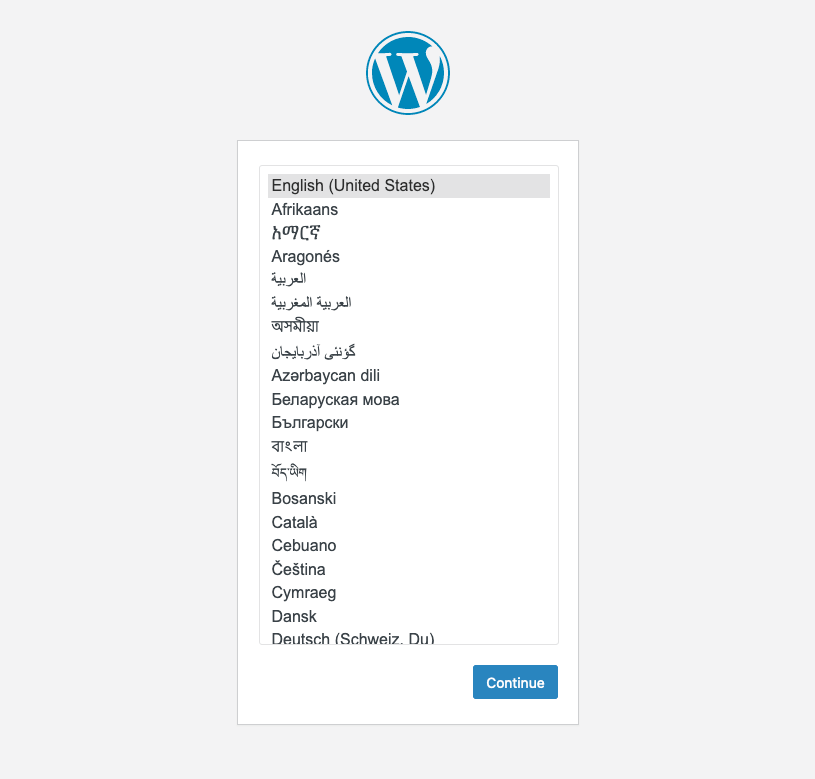
If this is your first time accessing WordPress, you’ll be greeted by the WordPress installation wizard screen. If you don’t see this screen, ensure you uploaded the WordPress files correctly and to the right directory. - Choose a Language: The first screen of the WordPress installation allows you to select your preferred language for the WordPress dashboard.
Make your selection and click Continue.
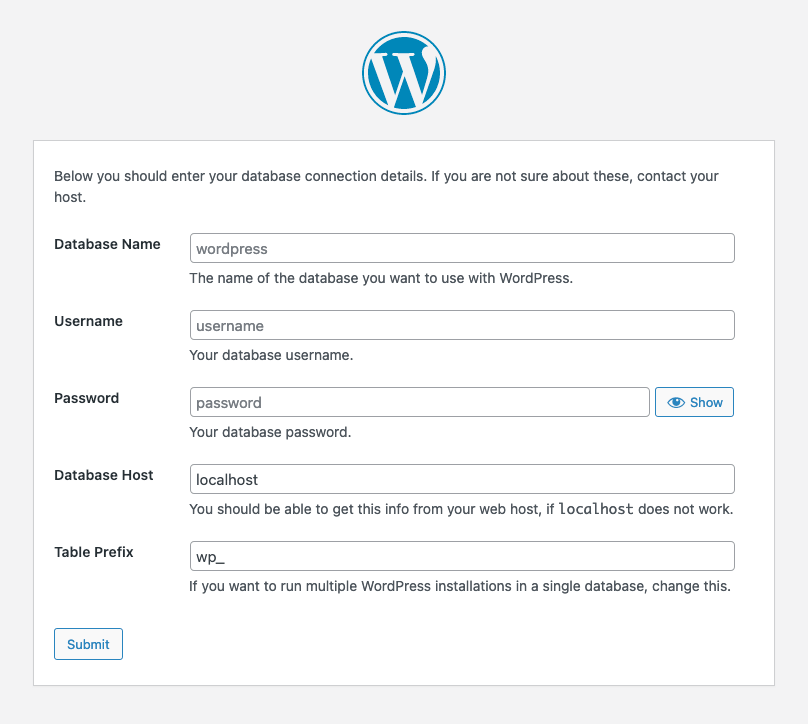
- Database Configuration: You’ll see a prompt to enter your database details next. This is where the database name, username, and password you created earlier come into play.
Fill in these fields:
Database Name: The name of the database you created for WordPress.
Username: The username assigned to the database.
Password: The password you chose for the database user.
Database Host: This is typically localhost for many web hosts. If unsure, confirm with your hosting provider.
Table Prefix: Changing the prefix is helpful if you plan to run multiple WordPress installations in a single database. Otherwise, leaving it as the default wp_ is fine.
After entering your database information, click Submit.
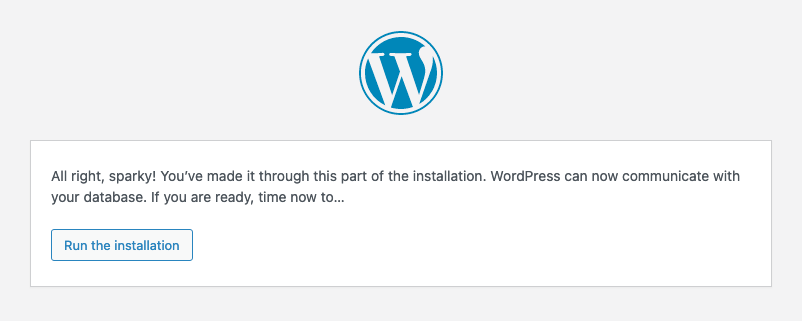
- Initiate the Install: WordPress will connect to your database. You’ll be prompted to run the installation if the connection is successful.
Click Run the installation.
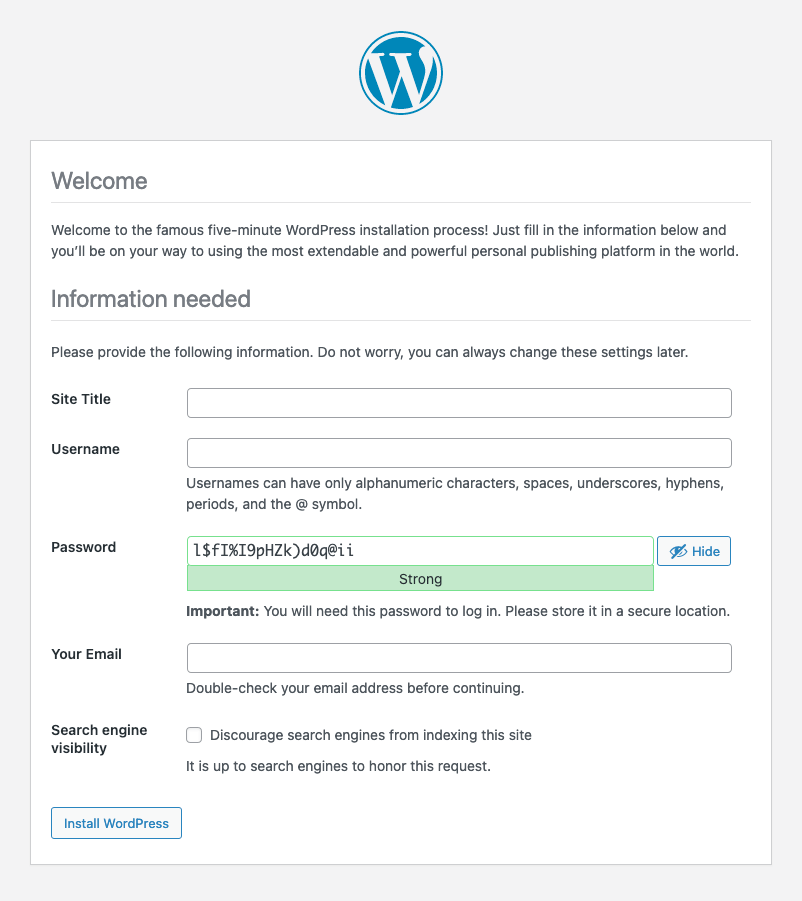
- Site Details: You’ll be asked to provide information about your site, including the site title, and create an admin account. The admin account will have full access to your WordPress site, allowing you to customize your site, create content, and install plugins and themes.
Site Title: The name of your WordPress website.
Username: Create an admin username (avoid using “admin” for security reasons).
Password: Choose a strong password for the admin account.
Your Email: Enter a valid email address. This will be used for admin purposes, like resetting your password.
After filling in your site details and admin account information, click the Install WordPress button.
- Install WordPress: WordPress will finalize the installation, and within a few moments, you’ll see a success message indicating that WordPress has been installed.

- Log In to Your Dashboard: You can now click on Log in to log in to your WordPress admin dashboard using the admin username and password you just created. The dashboard is where you’ll manage your site, from customizing its appearance to publishing your first post.
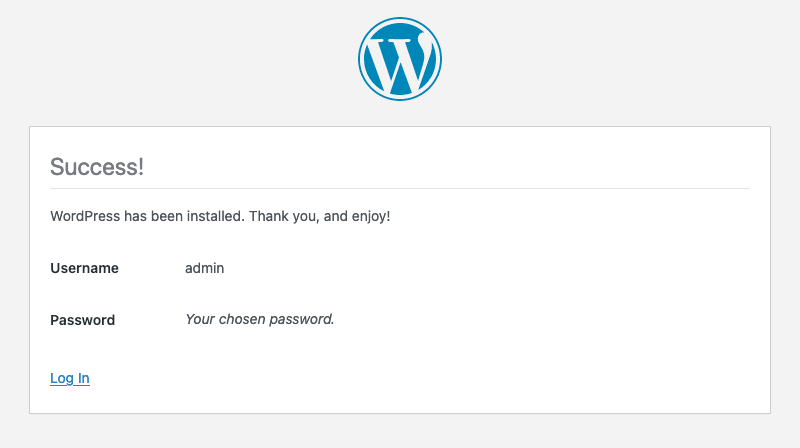
Congratulations! You’ve successfully managed to install WordPress on your site manually.
The Final Touch: Choose Your Ideal Theme
WordPress offers a flexible platform for building various websites, whether you choose the automatic or manual installation process. Begin by selecting a theme and customizing your site to match your vision.
Whether showcasing photography, launching a business, or starting a blog, our themes at WPZOOM are designed to elevate your content and impress your visitors.
- Inspiro PRO is a professional portfolio theme fully focused on the Elementor page builder. It provides the best video and photo features for creatives. Custom modules, various layout options, pre-built templates, handpicked customization options, dynamic elements, and extremely user-friendly make it a great choice.
- Inspiro Premium is a professional WordPress theme tailored for photo and video content. It features a fullscreen slideshow that supports YouTube, Vimeo, and self-hosted videos. With its modern design, Elementor integration, and versatile gallery module, Inspiro is perfect for showcasing diverse portfolios, images, and videos, which is ideal for creative professionals.
- Anchor is a WooCommerce block theme designed for online clothing stores. It revolutionizes your site with Full Site Editing and integrates smoothly with WooCommerce for hassle-free shop setup. Enjoy creative freedom with unique page layouts, block patterns, and color options. Anchor empowers you to craft a stylish e-commerce platform with ease and efficiency.
Still undecided? We invite you to explore all our themes at WPZOOM. With a wide variety of options, you’re sure to find the perfect match for your new WordPress site. Each theme has detailed documentation and dedicated support to ensure a smooth setup.