SSL certificates are the backbone of a secure internet and are essential for any website owner, including those running sites on WordPress. Beyond security, SSL has become a significant factor in search engine optimization (SEO), influencing a site’s visibility and ranking in search engine results.
In this article, we’ll guide you through the importance of SSL for WordPress, how to prepare your site for SSL, the different methods of acquiring certificates, how to install an SSL certificate on WordPress, and finally, ensuring your site is fully configured to operate over HTTPS.
Table of Contents
- Understanding SSL for WordPress
- Acquiring an SSL Certificate
- How to Install an SSL Certificate on WordPress Using Your Web Host
- How to Add the SSL Certificate to WordPress Using a Plugin
- How to Install SSL on WordPress Manually
- Configuring WordPress to Use HTTPS
- Troubleshooting Common WordPress SSL Issues
Understanding SSL for WordPress
Before exploring the technicalities of adding SSL to WordPress, it’s crucial to understand what SSL certificates are and why they’re indispensable for website security and trustworthiness.
What Is an SSL Certificate?
An SSL (Secure Sockets Layer) certificate is a digital certificate that accomplishes two key functions:
- It authenticates the identity of a website, ensuring visitors that they’re not on a fraudulent site
- It encrypts the data transmitted between the visitor’s browser and the web server.
This SSL encryption makes it incredibly difficult for unauthorized parties to intercept and understand the data being exchanged, thus safeguarding sensitive information from being compromised.
Why Add SSL to WordPress
The reasons to enable SSL on WordPress are numerous, extending beyond the fundamental need for security:
- Data Protection: A WordPress SSL certificate encrypts the data exchanged between your site and its visitors, protecting it from hackers and identity thieves.
- Authentication: By verifying that your site is the one server it claims to be, SSL certificates prevent visitors from being redirected to fraudulent sites.
- Trust and Credibility: Sites with WordPress SSL certificates display a padlock icon in the browser’s address bar, signaling visitors that their connection is secure. This visual indicator boosts users’ trust and confidence in your site.
- SEO Advantages: Google and other search engines prefer SSL-secured websites in their search results. When you add an SSL certificate to WordPress, you enhance your site’s search engine ranking, making it more visible to potential visitors.
Acquiring an SSL Certificate
The next step is to obtain an SSL certificate. There are three paths you can take:
- Through your hosting provider. The first step is to check whether your hosting provider supports SSL certificates and if they offer any SSL options themselves. Many hosting providers include a free SSL certificate in their hosting packages. They may also offer premium SSL options for WordPress sites requiring higher security, such as EV (Extended Validation) certificates. This is often the easiest and most cost-effective option for WordPress users.
- Get a Free SSL Certificate from Let’s Encrypt. Let’s Encrypt offers free SSL certificates suitable for most websites aiming to secure their data. The primary advantage of a Let’s Encrypt SSL certificate is cost-effectiveness, as it provides a basic level of security without the expense of premium SSL certificates. They are perfect for small to medium-sized websites, blogs, and personal projects.
- Through Certificate Authorities (CAs). For WordPress websites that require a higher level of security, such as e-commerce sites, purchasing a premium SSL certificate directly from a CA like Sectigo or DigiCert might be the best option. Premium certificates are recommended for websites that handle sensitive information, such as personal data and credit card information.
If you’re considering purchasing an SSL certificate directly from a certificate authority, it’s important to know that various types of SSL certificates are available.
Choosing the Right Type of WordPress SSL Certificate
Each type serves different needs and levels of validation:
- Domain Validation (DV) certificates are the most common and easiest to obtain. DV certificates are ideal for blogs and small websites that aim to encrypt user data.
- Organization Validation (OV) certificates require more validation than DV certificates, including checks on the organization behind the website. They are suitable for businesses and organizations that want extra assurance to their users.
- Extended Validation (EV) certificates offer the highest level of validation and trust, displaying the company name in the browser’s address bar. They are best suited for e-commerce sites and large businesses where user trust is paramount.
Choose the SSL certificate that best fits your site’s needs based on the level of trust and security you wish to provide your users.
How to Install an SSL Certificate on WordPress Using Your Web Host
The next step is to install SSL on WordPress. Many web hosting providers simplify this process, offering tools and assistance to add SSL to your site seamlessly.
Here’s a step-by-step guide to adding your SSL certificate on WordPress using your web hosting provider control panel, focusing on cPanel, one of the most common web hosting management tools.
- Access Your Hosting Control Panel: Log in to your hosting account and access the control panel provided by your host. This will often be cPanel, but some hosts have custom control panels.
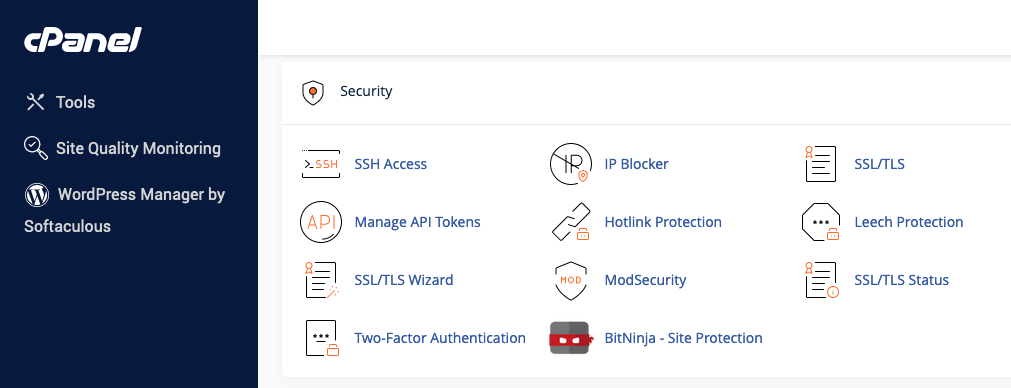
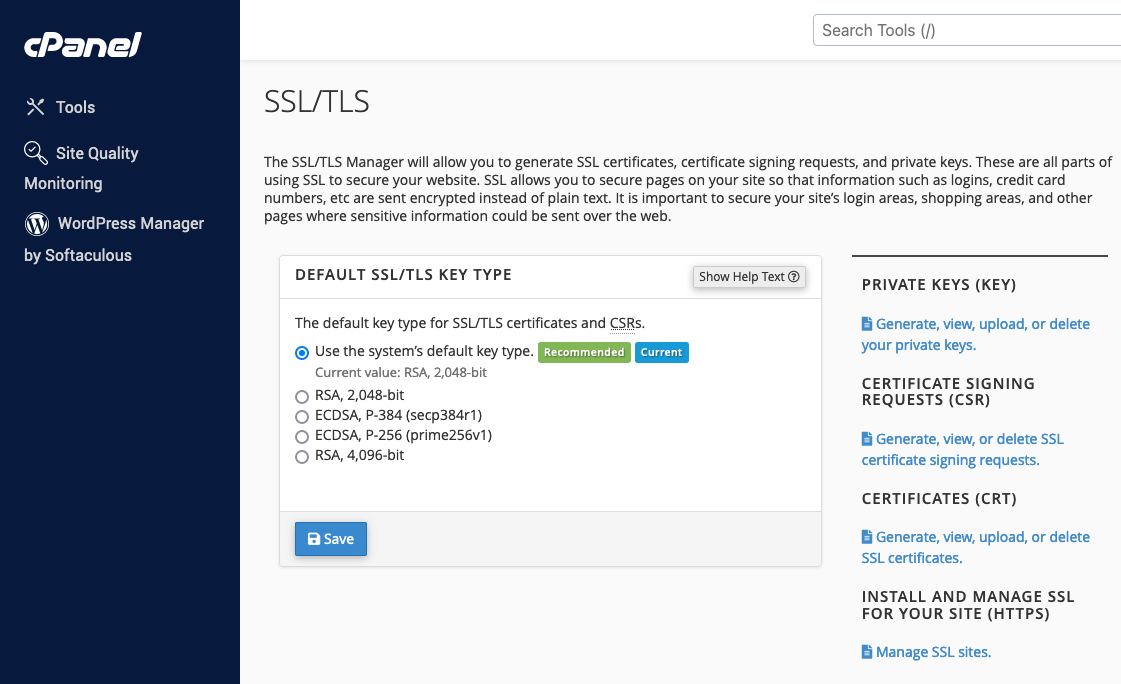
- Locate the SSL/TLS Manager. Within your control panel, look for the security section or directly for an SSL/TLS manager. This tool manages the keys, certificates, and signing requests related to SSL on your account. If you’re using cPanel, you’ll typically find it under the Security section.

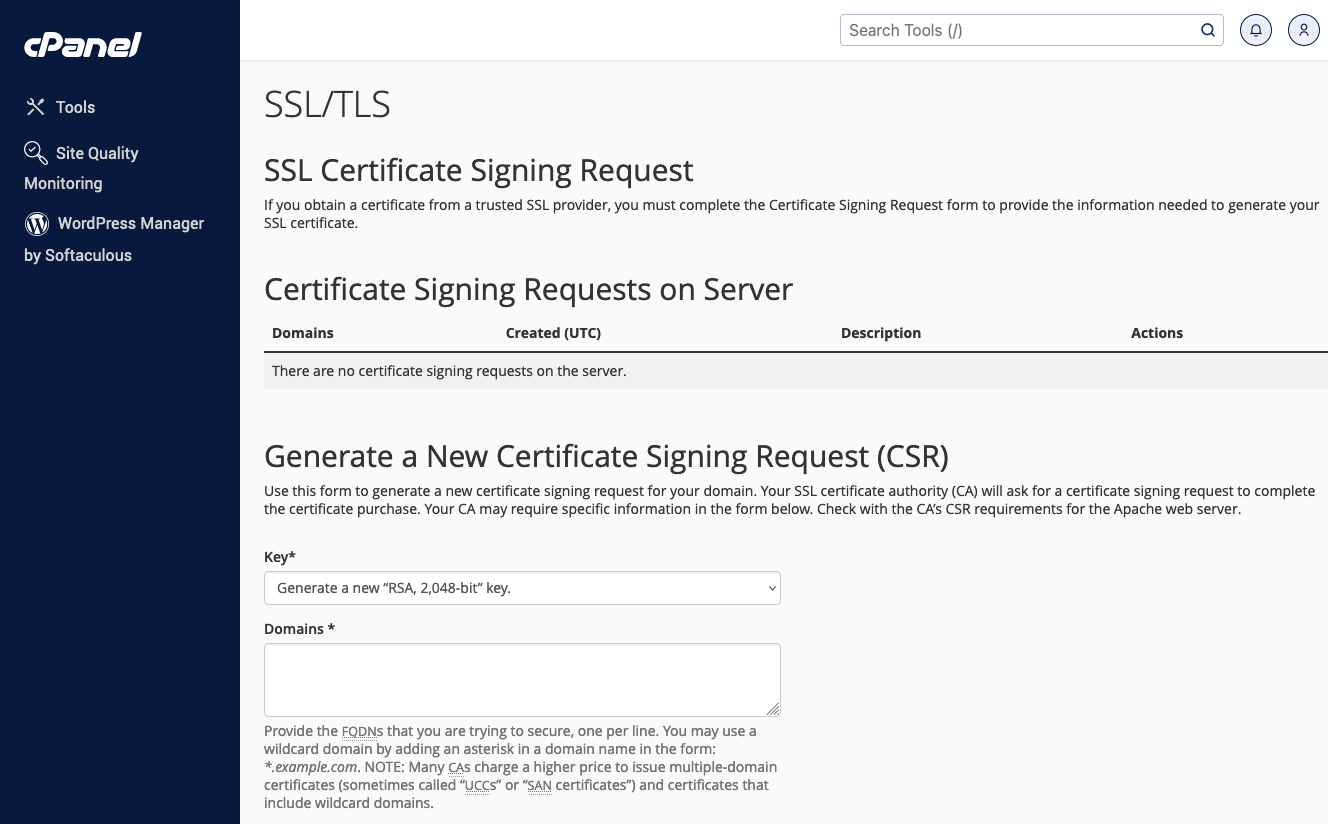
Next you’ll install your SSL certificate on WordPress. The process can vary slightly depending on your hosting provider, but generally, you will follow these steps: - Generate a Certificate Signing Request (CSR): Before installing your SSL certificate, you may need to generate a CSR if you haven’t already done so during the certificate acquisition process. The CSR is required by the Certificate Authority (CA) to create your SSL certificate.
In cPanel, you can generate a CSR through the SSL/TLS manager.
Fill in your domain and company details.
- Activate Your SSL Certificate: If you obtained your SSL certificate through your hosting provider, activation might be automatic, or you might need to manually activate it by entering a code or through a verification email sent by the CA.
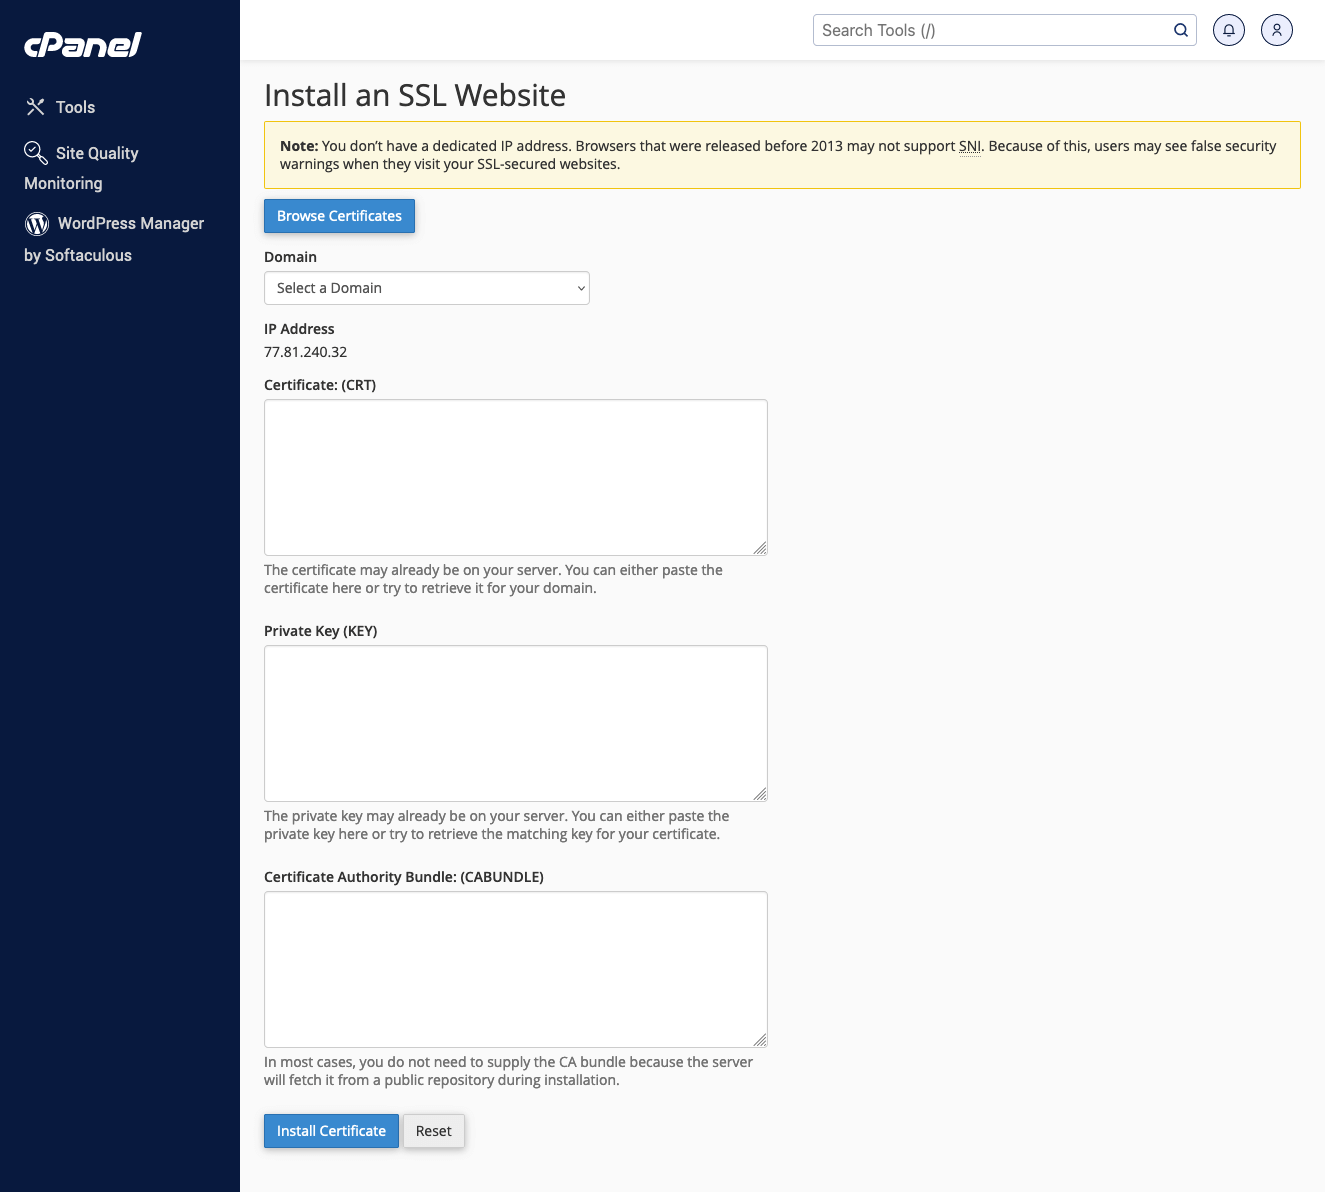
- Upload Your SSL Certificate: Once your SSL certificate is ready, upload it to your hosting account. In cPanel, you can do this by navigating to the SSL/TLS manager and selecting Manage SSL sites under Install and Manage SSL for your site (HTTPS). From there, you can copy and paste your SSL certificate files into the provided field, including any CA bundle that came with it.
- Update Your Domain Settings: After uploading the certificate, you must specify which domain it should be applied to. Select your domain from the dropdown menu and ensure the system correctly fills in the necessary fields (certificate, private key, and CA bundle).
Once everything is in place, click Install Certificate or the equivalent button in your control panel.
How to Add the SSL Certificate to WordPress Using a Plugin
Using a plugin can simplify the process significantly for users looking for a straightforward way to add SSL to WordPress. Among the various options available, the Really Simple SSL plugin stands out for its ease of use and efficiency in handling most of the technical aspects of the transition to HTTPS.
This section will guide you through installing and configuring SSL on your WordPress site using Really Simple SSL.
- Ensure Your Hosting Environment is SSL Ready. Before proceeding with the SSL WordPress plugin installation, ensure your hosting environment is prepared for SSL. This means your hosting provider should have already enabled SSL for your site and installed an SSL certificate on your server. If you need help, contact your hosting provider to confirm that your site is SSL-ready.
- Install the Really Simple SSL Plugin.
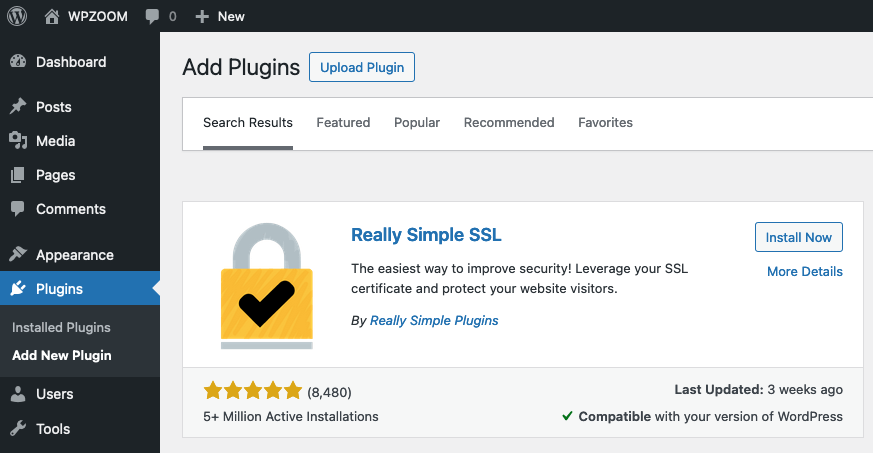
Navigate to your WordPress dashboard, go to the Plugins section, and click Add New Plugin.
Search for Really Simple SSL in the plugin repository. Install and activate the plugin by clicking Install Now and then Activate once the SSL certificate installation is complete.
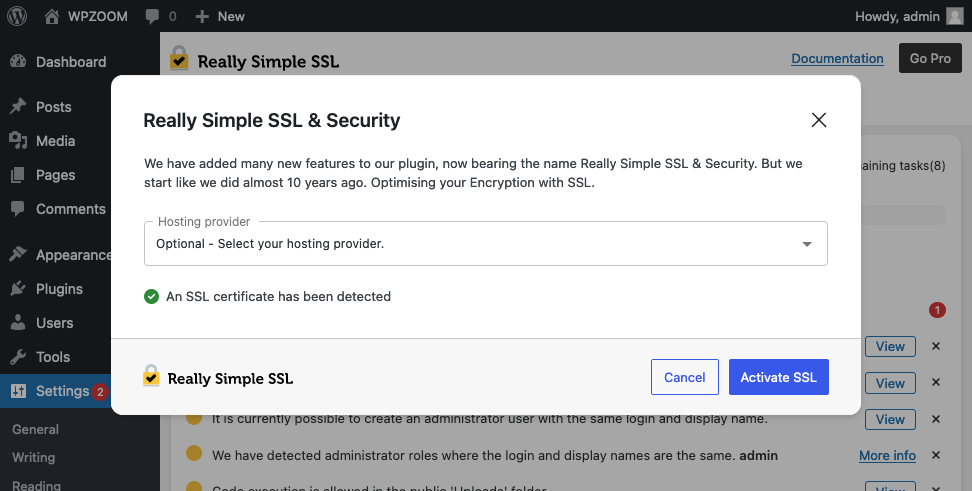
Upon activation, Really Simple SSL will automatically detect your WordPress SSL certificate.
- Run the SSL check recommended by the plugin. Really Simple SSL will scan to ensure your SSL certificate is detected correctly and your site is ready for HTTPS.
- Enable SSL with one click by pressing the Go ahead, Activate SSL! button. The plugin will then make the necessary adjustments to your site’s configuration to enforce HTTPS, including updating your site URLs and setting up redirects from HTTP to HTTPS.
How to Install SSL on WordPress Manually (Not Recommended for Beginners)
For those with technical expertise and specific needs that require direct control over the WordPress SSL installation process, manually installing SSL certificates is an option. However, this method involves interacting with server configurations and command-line interfaces, which can be complex and intimidating for beginners.
If you’re uncomfortable with server administration tasks, we strongly recommend using your web host’s control panel or an SSL WordPress plugin for a smoother, more user-friendly experience.
Below is a simplified overview of the manual installation process, intended to provide a general understanding rather than step-by-step instructions.
- Generate a Certificate Signing Request (CSR): This is a request you send to a Certificate Authority (CA) to obtain your SSL certificate. The process involves providing information about your website and organization. This step is typically done via your server’s command line interface.
- Submit the CSR to a Certificate Authority: After generating the CSR, you must choose a CA and submit your CSR to them. Once approved, the CA will validate your request and issue your SSL certificate.
- Install Your SSL Certificate on Your Server: Once you receive your SSL certificate from the CA, you’ll need to install it on your server. This involves accessing your server’s configuration files and placing your certificate in the appropriate directory. You must also update your server’s configuration to reference the new certificate.
Manual installation of an SSL certificate offers full control over the encryption of your site’s traffic but is complex and filled with potential risks for those unfamiliar with server administration.
Configuring WordPress to Use HTTPS
After successfully installing an SSL certificate on your WordPress site, either through your web host, a plugin, or manually, the next crucial step is configuring WordPress to use HTTPS for all connections. This transition ensures that all data transmitted between your site and its visitors is encrypted, enhancing security and user trust.
Below are the steps to guide you through configuring WordPress to use HTTPS fully.
- Log in to your WordPress Dashboard.
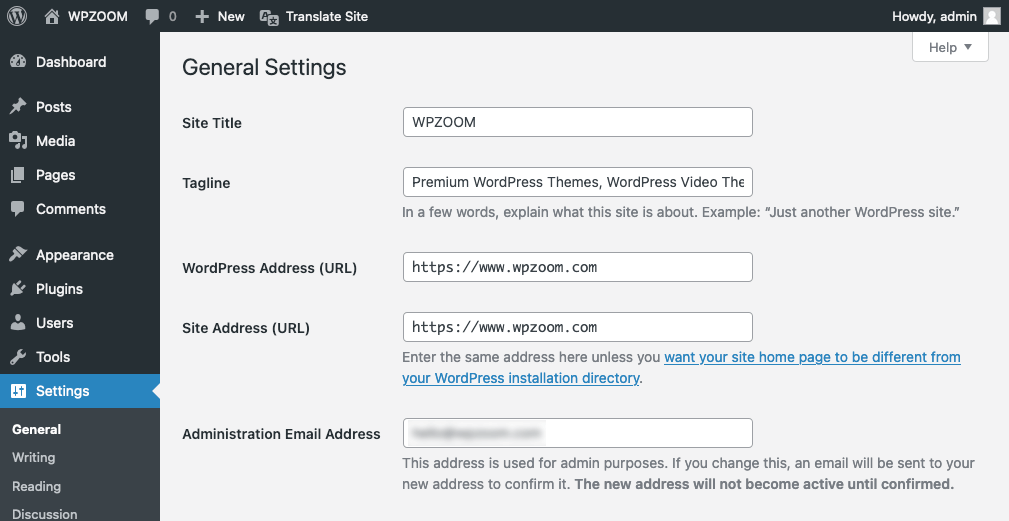
- Navigate to Settings > General.
Here, you’ll find two fields: WordPress Address (URL) and Site Address (URL). Change both of these from HTTP to HTTPS by adding the ‘s’ to the HTTP.

For example, change http://www.wpzoom.com to https://www.wpzoom.com. - Scroll down and click the Save Changes button.
- WordPress will log you out automatically, and you must log back in using the new HTTPS URL.
Troubleshooting Common WordPress SSL Issues
After transitioning your WordPress site to HTTPS, you may encounter some common issues affecting your site’s functionality or security. Here’s how to identify and resolve some of these frequent problems.
Mixed Content Warnings
Mixed content warnings occur when a webpage served over HTTPS loads resources (like images, videos, stylesheets, or scripts) over an unsecured HTTP connection. These warnings can undermine the security of your SSL certificate and cause browsers to display security warnings to users.
How to Fix:
- Use a Plugin: Plugins like Really Simple SSL can automatically detect and fix mixed content by rewriting HTTP URLs to HTTPS.
- Manually Search and Replace: Use a plugin like Better Search Replace to search your WordPress database for http:// and replace it with https://. Ensure you target resources hosted on your domain.
- Check Your Theme and Plugins: Sometimes, the issue stems from hardcoded HTTP links within your theme or plugins. Check the source code and update any HTTP links to the secure HTTPS protocol.
SSL Certificate Not Trusted
This error appears when a browser does not recognize the Certificate Authority (CA) that issued your SSL certificate or the certificate has been improperly installed.
How to Fix:
- Verify Your SSL Installation: Use tools like Qualys SSL Labs to check your certificate’s installation. This tool can identify issues like missing intermediate certificates.
- Consult Your Hosting Provider: If you’re unsure how to correct the issue, your hosting provider can verify that the SSL certificate is installed correctly and help resolve any problems.
Enforcing HTTPS Throughout Your Site
Even after installing an SSL certificate and updating your site settings, some users might still access your site via HTTP. This situation can occur if your site’s links and redirects are not properly configured to use the HTTPS protocol.
How to Fix:
- Implement HTTP to HTTPS Redirects: Edit your .htaccess file (for Apache servers) or your server configuration (for Nginx servers) to redirect all HTTP requests to HTTPS. This ensures that all visitors are using a secure connection.
- Update Internal Links and Resources: Ensure all internal links and resources within your site’s content use HTTPS to prevent security warnings and ensure a seamless user experience.
Bottom Line
Successfully transitioning your WordPress from HTTP to HTTPS by adding an SSL certificate is a significant step towards securing your WordPress website and building trust with your visitors. However, the process doesn’t end with the installation of the certificate. To truly ensure your site benefits from the security, SEO advantages, and user trust that come with SSL, you must maintain your site’s HTTPS status:
- Regularly check for expiry. Set reminders to renew your SSL certificate before it expires to avoid lapses in your site’s security.
- Monitor for Issues. Keep an eye on your site for any SSL-related warnings or errors. Regular use of SSL verification tools can help catch and resolve issues before they impact your visitors.
For further reading and to enhance your WordPress site’s security and SEO performance, consider exploring these comprehensive guides:
- Essential WordPress Security Guide: Dive deeper into best practices for securing your WordPress site, covering everything from basic precautions to advanced security measures.
- WordPress SEO Like a Pro: Best Practices Guide: Elevate your site’s search engine rankings with our expert guide on WordPress SEO.