FLASH SALE Get 20% OFF everything using the coupon code: FLASH20 View Pricing Plans →
With the release of WordPress 6.5, a new Font Library feature was introduced, allowing users to easily integrate and manage Google Fonts directly within their WordPress themes. This addition is particularly beneficial for block themes, enhancing the customization of typography without relying on external plugins or manual code adjustments. This guide provides a comprehensive overview of which themes support the Font Library, how to use this feature, and how to apply newly installed fonts to your website.
The Font Library feature in WordPress 6.5 is designed to be compatible primarily with block themes. Block themes are themes that fully utilize the WordPress Site Editor (Full Site Editor) for all parts of the website, including headers, footers, and content areas. These themes are inherently more flexible and adaptable to the integration of new features like the Font Library.
In case you are not sure if you have a block theme or not, this can be easily determined whether there is a “Edit Site” link in the admin bar when viewing your website or if you have an “Editor” section under the Appearance menu in the Dashboard:

If you are using a classic theme or one that does not support full site editing, you may need to consider switching to a block theme to take advantage of this feature.
Using the Font Library in WordPress 6.5 is straightforward. Here’s how you can add new Google Fonts to your block theme:
Access the Site Editor:
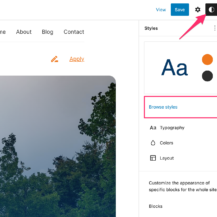
Access the Styles > Typography section:


Once you have added fonts to your library, applying them to your site is possible in different ways:
Apply Fonts to Theme Elements:

Apply Fonts to Individual Blocks:

The introduction of the Font Library in WordPress 6.5 simplifies the process of incorporating and managing Google Fonts in block themes. By following the steps outlined above, you can enhance the typography of your WordPress site, providing a more personalized and professional appearance. Remember to keep your theme updated and check for Font Library compatibility to make the most of this feature.